Monday, April 26, 2010

The Step by Step Guide to Getting a Job in oDesk


The fourth step to this guide on how to get a job in oDesk is:

Step 4. Take Tests to Show your Abilities

You would have better chances of landing a job if you took at least one test in oDesk, aside from the oDesk Readiness Test. If you're new on oDesk, then it's highly advisable that you take the tests. They take 40 minutes or less if you're already an expert. There are various tests such in English, Marketing, Business, Finance and Accounting, and Information Technology.

a. If you want to apply as writer or editor of articles, then you have to get any of the English Tests.


b. Take the test. If you failed it, you can take it again in one month. If you passed, you could choose to publish the test result or to keep it private.
c. Take the oDesk Readiness Test. This would allow you to apply for 20 jobs. The more jobs you apply to, the more chances that you get one, right?


The On Demand Global Workforce - oDesk

Wednesday, April 7, 2010

The step by step Guide to Getting a Job In oDesk

The third step to this guide on how to get a job in oDesk is:

Step 3. Fill Out your Profile

a. Go to your profile and click Provider Profile. At the bottom right corners of each box you will see the "edit" button. Click it.


b. Upload a picture. Fill out the profile with your education, portfolio, work experience, and skills.

c. The more information you upload, the better. I realized that you cannot apply for transcriptionist, IT, or designer jobs unless you populate your portfolio - because this is what buyers look for when they check your profile.

The step by step Guide to Getting a Job In oDesk


Step 2. Choose your Payment Method

This is the second serving of the step by step guide on how to get a job in oDesk: Choose your payment method.

This is another plus about working in oDesk – you get to have a debit Mastercard for free! Powered by Payoneer. The card looks like this:

You don’t have to submit bank statements or proof of billing – all you have to submit is either a copy of your valid driver’s license or a copy of your passport – to establish your identity.
a. First, go to "Payments" on oDesk's menus. If you have a Paypal account, then select the second option. If you don't have one, and also don't have a credit card, then click the first option, which is to apply for a Debit Mastercard - powered by Payoneer. You would be redirected to Payoneer and would have to register again. Just be sure that you type your correct name and address or else the card won’t reach you. It is advisable that your complete name in oDesk matches your complete name in the Debit Mastercard.
b. You would get an email, asking you to submit ID card. They would only accept one of two IDs, your passport or your driver's license. I submitted my scanned driver's license via email.
c. You would get your card in 2 weeks. Verify it in your Payoneer account by by typing your card number.
d. You're ready to get paid in oDesk!

Tuesday, April 6, 2010

The step by step Guide to Getting a Job In oDesk

Welcome to my step by step guide on how to get a job in oDesk!

This guide will hopefully help you to get a job in oDesk. Aside from providing steps, I will also give tips on how you could get the job you want, and get paid in US dollars.

We'll of course start with registration. Registration is simple and similar to that of other sites. So if you're familiar with this process, you may skip it and proceed to Step 2 - Choose your payment method.

Step One: Register

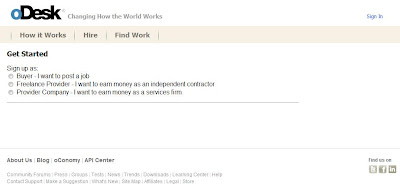
a. At the odesk landing page, you would see on the upper right portion two options: Sign in and Register. Click Register. You would be redirected to page that looks like this:


b. Click Freelance Provider (second option).
c. The page would then be extended to include this:


d. You may have to provide your real name, because your odesk account will be linked to a Paypal, credit card, or debit card (Payoneer) account. So your name in these accounts will have to match your oDesk name. Don’t worry if you don’t have a Paypal or credit card account, you would still get paid. This topic will be discussed in Step 2 (Choose your payment method).

e. Once you finish typing all the information, verify what you encoded, and click ‘Continue’.

f. oDesk will either inform you that you have registered successfully, and ask you to verify your account through email, or let you correct some missing information.

g. after this, proceed to Step 2 of this step by step guide to Getting a Job in oDesk.

finance

Monday, April 5, 2010

About Me

My photo
just my take on politics and culture